SZYM Intruder 6
User Manual
Welcome to your new SZYM Intruder.
To help you get the most out of your new vehicle, we recommend browsing this manual in its entirety.
However, users of the SZYM Intruder 5 should at least read the section titled What's New in SPT2 to learn about new features.
Although not required, we highly recommend joining the NTBI News Network group for notifications about updates and things.
If you're logged in, clicking the link above will send you an invite to join the group.
If you have any questions or concerns about your purchase, let us know.
Your box should include the following:
- SZYM Intruder Agent - police model with Agent 4 slick-top lightbar
- SZYM Intruder Civilian - standard civilian model with all features
- SZYM Intruder Economy - basic civilian model, optimized for low prim count
- SZYM Intruder Priority - police model with Priority 4X lightbar
- SZYM Intruder Taxi - taxi model with taximeter, ad board, and interior divider
- SZYM Intruder Vertex - police model with Vertex LED lightbar
These are all the same basic vehicle, but to reduce prim count and unnecessary script usage, each package has different equipment installed.
The SZYM Intruder 6 features SPT2, the next-generation powertrain from NTBI. SPT2 drastically improves handling and adds a ton of new features:
- Upgraded Engine - among other improvements, the SPT2 engine can now climb practically any incline
- Better Brakes - stopping on hills is easy, and the parking brake can be easily applied on steep terrain (see Controls section below)
- Smooth Steering - from small corrections to hairpin turns, our new steering model makes driving a breeze, in the city or on the track
- Active Suspension - a Second Life first, our suspension actually moves the wheels up and down along with terrain and leaning
- Get Out Option - select Get Out from the menu to open your door and get out behind it - no more standing on the roof!
- Realistic Satnav - the built-in satnav features a map, navigation, music, and more, all without having to enable prim media
- Handbrake - finally, a handbrake that makes sense, and makes high-speed driving a blast! (see Controls section below)
- Web Config Live Preview - view your Web Config changes in real-time, showing off more customization features than ever before
Although practically everything in your vehicle has been redesigned, it's easy to learn if you've used SPT before. Get out there and start driving!

You're probably pretty excited to hop in, but there are a few things that we need to cover first.
Before driving for the first time, click your vehicle and select Get HUD. You'll be sent an EVHUD, which adds a lot of additional controls. Right click it in your inventory and select "Wear" or "Add". If you want, you can attach it to a different HUD position. You can also edit it to move it around. For more information on the EVHUD, see the section labeled EVHUD Operation.
You may also want to configure your car before you drive it. Click the Web Config button, then click Go to page to load Web Config. (You can also click the Man Config button for manual configuration, although this includes only basic options.) For more information on Web Config, see the section labeled Web Config & Live Preview below.
As a general rule, it's recommended to detach unnecessary attachments if you're going to be driving fast across region crossings, e.g. mainland driving. In most cases, attachments and HUDs cause slow (or failed) region crossings - not the vehicle.
Once you're set up, you're ready to go. Right click the vehicle and select Drive to get in. You may want to refer to the Controls section below, as your vehicle is equipped with more than just arrow keys and WASD. Happy driving!
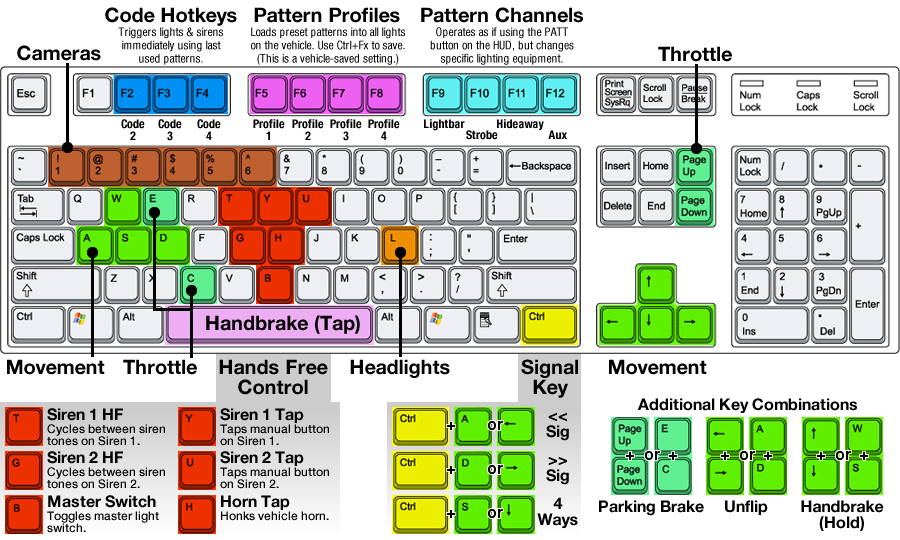
This probably looks pretty confusing, so let's walk through it step by step:
- Movement - these are the WASD & arrow keys, which work like you'd expect. Up/W accelerates, Down/S brakes, and Left/A & Right/D steer.
- Throttle - SPT2 vehicles have a throttle, which sets a target speed. PgUp/E increases the throttle, PgDn/C decreases it. There are some additional tips on using the throttle, which are covered in the SPT2 Handling section.
- Headlights - the L key will cycle through your headlights.
- Signal Key - holding Ctrl then pressing Left/A, Right/D, or Down/S will trigger the left & right turn signals, and the hazard "4WAY" flashers. Pressing the key again, or finishing a turn, will shut them off automatically.
- Cameras - the number keys (1-6) activate cameras for the driver & front passenger. These cameras may vary depending on the vehicle & seat.
- Parking Brake - this will enable/disable the parking brake, which is useful when trying to stop on very steep inclines.
- Unflip - this will attempt to flip the car back up, if it has rolled onto its side or roof.
- Handbrake (Hold) - this will trigger the handbrake, which will cause the rear wheels to spin until the keys are released. See SPT2 Handling.
- Handbrake (Tap) - this will trigger the handbrake more easily, but the wheels will spin until the accelerator is released instead. See SPT2 Handling.
- Pattern Profiles and Pattern Channels - these keys control the patterns for emergency lighting installed on the vehicle. See EVHUD Operation.
- Code Hotkeys and Hands Free Control - these keys control the hands-free functions on the EVHUD. Again, see EVHUD Operation.
It's important to note that the Movement and Throttle keys, and the keys listed under Additional Key Combinations, are the only keys that work by default. To enable the rest of the keys, you must get the EVHUD Gestures by clicking the Menu button on the lower right of the EVHUD, clicking Get Gestures, accepting the folder, and activating all gestures inside it (select all, right click, Activate). If some keys do not work (or only work occasionally), make sure you do not have any conflicting gestures activated - press Ctrl+G and sort by Key to identify and correct these conflicts. A good rule of thumb is to deactivate all other gestures, just in case.
Some keyboards don't process key combinations correctly, so the Handbrake keys may not work in some instances. For example, the spacebar may not trigger the handbrake correctly when turning and accelerating, or the Up+Down keys may not work. In our testing, we discovered that using two hands (WASD to drive, and Down key to hold the handbrake, or vice versa) generally works much better. Of course, your driving style is for you to decide.
We designed SPT2 to work best in an urban environment. We've taken suggestions from years of feedback and used it to design an engine & transmission that's perfect for city driving, but handles great on highways as well. As such, SPT2 takes the best aspects of powertrain scripts over the past decade and combines them into an unbeatable package.
Learning the ins and outs of SPT2 is simple, and experience is really the best teacher. However, here are a few tips that you may not have known:
- Mouselook - driving in Mouselook is recommended, but certainly not required. Press the M key or scroll your mousewheel up until you are in first person (Mouselook) mode. From here, you can control the windows, headlights, horn, satnav, A/C, glovebox, visors, and dome light by clicking them. You also get to see our fully-functional gauge cluster in action.
- Throttle - unlike the original SPT, SPT2's throttle works by setting a target speed. The text display in the gauge cluster will show the target speed when you set your throttle. If you're wearing the EVHUD, it will also show up there. The throttle is not a gear - consider it more like the gas pedal. The higher the throttle, the further you push the pedal.
- Reversing - over the past few years, drivers have split into two groups - those that like our automatic "arcade-style" braking for easier driving, and those that like a dedicated reverse gear for more precise control. We figured, why not have both? When fully stopped, just hit Down/S again to automatically go into reverse (or Up/W to switch back to forward). Alternatively, press PgDown/C until you reach the "R" throttle, and you'll be in reverse, or press PgUp/E to go back to forward.
- Handbrake - SPT2's handbrake can be triggered in two ways - Spacebar and Up+Down. Spacebar will spin the rear axle until you let go of the accelerator, while Up+Down will spin the rear axle only while they are held. (As noted in the Controls section, these combinations may not always work for you.) The Handbrake causes a loss of traction in the rear wheels, which lowers your speed and allows for controlled drifting. This is great for quick hairpin turns, donuts, and just showing off. Our powertrain also automatically adjusts inputs so that you won't spin out when trying to drift - because of this, it's not necessary to "steer into the skid", as it would be in real life.
- Suspension - at higher speeds and during heavy acceleration/braking, you'll notice that the vehicle leans to simulate its momentum. Keep in mind that if you throw the car around too much, it might flip over. (Of course, just hold Left+Right to unflip it.)
- Sound & Physics Effects - SPT2 vehicles now have suspension & crash sound effects, which make driving even more exciting. Plus, the engine is designed to simulate gravity, loss of handling, etc. when in the air, unlike most other vehicles.
Before continuing, it's worth pointing out that the EVHUD supports Passenger Control. When a passenger sits in the front seat and wears an EVHUD, the driver will be given the option of allowing them to control the vehicle through their own EVHUD (with some minor exceptions, such as turn signals and headlights).
Additionally, the EVHUD has State Memory, which means it will load the button states left by the last driver. This eliminates having to double-click buttons to turn off lights, for example. The EVHUD is the only HUD in Second Life with these two features!
Now, let's take a look at the EVHUD's layout. Below is the EVHUD for a SZYM Intruder Priority.
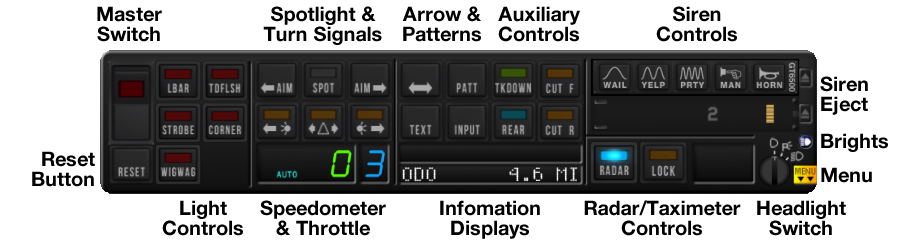
Please note that the EVHUD automatically changes its buttons to only show controls for equipment installed on your specific vehicle. However, the general layout will always remain the same. The EVHUD is, additionally, backwards compatible for most NTBI vehicles up to 5 years old.
There are some general concepts about the EVHUD's layout that will help you get the most out of it:
- Master Switch - the Master Switch will only control buttons with red lights. Generally, all of the buttons on the left are controlled by the Master Switch; however, some vehicles have other controls in this area. These controls will have an amber, green, or white light (or no light at all) and do not require the Master Switch to be on.
- Reset Button - to reset the HUD to "legacy mode" (some very old NTBI vehicles require this) press and hold the RESET button.
- Spotlight Controls - these allow you to aim the spotlight, as well as turn it on and off, if a spotlight is equipped. If a passenger-side spotlight is installed on the vehicle, the passenger can control their spotlight with these controls; otherwise, they are non-functional.
- PATT Button - the PATT button allows you to change the pattern on emergency lighting equipment. To cycle through patterns on a specific unit (Lightbar, Strobes, Corner, etc.), press and release the button. To switch to a different unit, press and hold the button until it changes to the unit that you want to set the pattern on. We recommend using the Pattern Channel keys instead, which are covered below.
- TEXT & INPUT Buttons - these are shown if the vehicle is equipped with an InfoCenter Traffic variable text message display in the rear window.
- If the vehicle's arrow stick mode is "InfoCenter Scroller", you must press the arrow (⇔) key to switch the InfoCenter Traffic into text mode, then press TEXT to cycle through pre-programmed patterns or INPUT to enter your own custom message.
- If the vehicle's arrow stick mode is a "PR4X" mode (an option only on Priority packages), you must press the TEXT button to turn on the InfoCenter Traffic, then INPUT to enter your own custom message. In this mode, you cannot use pre-programmed messages.
- CUT F & CUT R Buttons - these buttons will turn off the front and rear lighting, respectively, for the lightbar, strobes, and corner hideaways (if equipped). If the vehicle has wigwag, takedown, and/or takedown flash options, they will not be affected and must be turned on/off manually.
- Blue Buttons - buttons with blue lights, such as RADAR and REAR above, control the radar/taximeter. Additionally, buttons within the radar/taximeter control area always control them regardless of their light color, such as LOCK.
The EVHUD's sirens are, unquestionably, Second Life's best. We've included 12 siren packs at no charge - you don't have to buy sirens to find the one you want. Plus, the EVHUD is the only HUD which allows you to control two sirens at once in a simple, user-friendly interface.
To install a siren, click an empty slot and browse through the available packs. Each pack sounds different, and some have more details than others, but all have 3 tones and 2 momentary buttons. To eject a siren, click the eject button to the right of the unit you want to remove.
Siren operation is extremely simple - just click the tone you want, or hold one of the momentary buttons. To turn the siren off, click the active tone again.
There is a lot more to learn behind this simple interface, however. Remember, the following features require that you have the EVHUD Gestures activated. Refer to the Controls section for help with this. Additionally, the EVHUD must be worn for these controls to work.
First, you may want to use the Code Hotkeys, which trigger lights & sirens immediately using last used patterns:
- Code 2 (F2) - turns on the Master Switch and turns off both sirens.
- Code 3 (F3) - turns on the Master Swtich and both sirens (if installed).
- Code 4 (F4) - turns off the Master Switch and both sirens.
Or, you may want a little more refinement, which is where our Hands Free Control keys come into play:
- Master Switch (B) - toggles the Master Switch.
- Siren 1/2 Hands Free (T/G) - cycles through siren tones (Wail ➨ Yelp (Momentary) ➨ Yelp ➨ Priority ➨ Off).
- Siren 1/2 Tap (Y/U) - taps the manual button on either siren.
- Horn Tap (H) - honks the horn. Note that this always uses the stock horn, even if the horn is set to a siren.
As noted above, instead of using the PATT button, you may want to use the Pattern Channel buttons:
- Lightbar Patt (F9) - cycles through patterns on the lightbar, if equipped.
- Strobe Patt (F10) - cycles through patterns on the strobes, if equipped.
- Corner Patt (F11) - cycles through patterns on the corner hideaways, if equipped.
- Aux Patt (F12) - cycles through patterns on any other lighting unit. This vehicle does not use the Aux channel.
However, you may not want to constantly tap through patterns on the road to find the pattern you want. That's where our new Pattern Profiles come in. Say, for example, you want to set your lightbar up in the cruise pattern when you're just driving around, but you want to easily be able to switch into the default (CYCLE FULL) when you're Code 3. Simply set up the patterns you want (in this case, set your lightbar to a cruise pattern), then press Ctrl+F5/6/7/8, depending on which profile you want to save it to.
- Load Profile 1/2/3/4 (F5/F6/F7/F8) - loads the saved pattern profile.
- Save Profile 1/2/3/4 (Ctrl+[F5/F6/F7/F8]) - saves current patterns to the chosen pattern profile.
Pattern profiles store the patterns on all lighting equipment, but do not store light power states. So, in our example, you would have to manually turn off all lights except for the lightbar, then load the cruise profile. This setting is stored in the vehicle, not in the HUD, so you will have to set this up on every vehicle. Additionally, it is not stored in the vehicle's configuration. By default, all pattern profiles use CYCLE FULL (the default pattern) on all lighting equipment, so it's recommended to leave Profile 1 (F5) as the default.
If you're looking for templates for custom graphics, see the Templates & Custom Graphics section near the bottom of this page.
The SZYM Intruder 6 features an unprecedented amount of customization. In the interest of brevity, we won't cover all options here - most are pretty self-explanatory, anyway. However, we'll briefly cover how to cutomize your vehicle.
This vehicle has two options - Web Config and Man Config. Man (Manual) Config only allows for some basic customization, but is useful for quick changes in the field. However, you'll probably want to use Web Config for your customization. To start Web Config, click the Web Config option in the main menu, then Go to page. Your web browser will open, and you'll be shown the new Web Config interface. (If you haven't set up an NTBI Group account, you'll be prompted to enter a password. You will not need to use this password when using Web Config in the future - it is only used to log into the website manually. You likely already did this when you opened this help page from the vehicle.)
As mentioned above, there are so many options in Web Config that we're not going to explain them all here. However, there's one aspect of Web Config that we'll explain - the welcome page. This is where you can select which configuration you want to load:
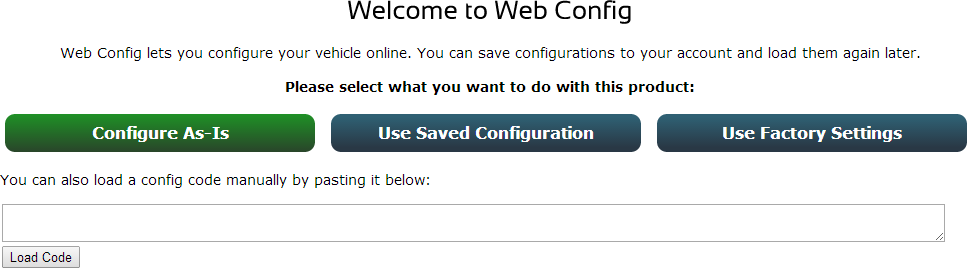
- Configure As-Is - this will use the configuration from the vehicle that you're customizing. This is probably what you want to do.
- Use Saved Configuration - this will show a list of compatible configurations that you've saved before. Click Load This Configuration to use one.
- If you've never saved a configuration before, this will obviously not show any saved configurations.
- You can use configurations from older versions; however, some options may have changed, and theme textures may have been updated. If using a stock theme, select it again to update to the new texture.
- Use Factory Settings - this will load the factory defaults for this model and package. Useful if you've screwed everything up beyond all recognition.
- Load Manually (textbox) - you can paste a config code here to load, if it's the same model and package, then click Load Code.
The new Web Config is streamlined and more user-friendly than before. First, you'll notice that there is no preview image - instead, Web Config now supports Live Preview. Changes you make in Web Config are instantly sent to the vehicle in-world, allowing you to see your selections immediately. Because of this, Web Config now loads much more quickly. Plus, we've redesigned the backend so that setting up options and settings is automatic in the background, so you won't experience any errors or bugs (hopefully).
On the last page in the Save & Send Configuration section, you'll be given the option to save your configuration to your account. This is optional, but as there are no limits on how many configurations you can save, there's no harm in doing so. Keep in mind that if you enter a name that's been saved before on your account, you will overwrite the old configuration.
Once you're done, click Finish Configuration to send it to the vehicle and, if you wanted to, save it to your account.
The SZYM Intruder 6 includes a variety of trunk equipment in the Priority, Vertex, and Agent packages:
- Road Cone - click and allow it to attach, then enter Mouselook and click on the ground to place cones.
- This model features updated cones which can be placed on any incline.
- You can select one of six cone colors in Web Config, in the Options section. Only one cone color can be stored in the trunk.
- Police Line / Caution Tape - click and allow it to attach, then enter Mouselook and click on the ground to place a pole, or a wall to use tape.
- The model also features updated tape with the wall tape option, as well as an option to use either Police Line or Caution tape.
- You can select between Police Line and Caution tape in Web Config, in the Options section. Only one tape style can be stored in the trunk.
- Road Flare - click and allow it to attach, then enter Mouselook and click to drop, or click and hold to throw.
- TPF2 Fire Extinguisher - click and allow it to attach, then enter Mouselook and click to spray.
- Additional Equipment - click the duffel bag, then click Go to page to be shown a list of equipment which can be delivered to you.
- This equipment will be added to in the future and is delivered from our server, not the vehicle. All of it is free.
- You can get the additional equipment directly from our website as well.
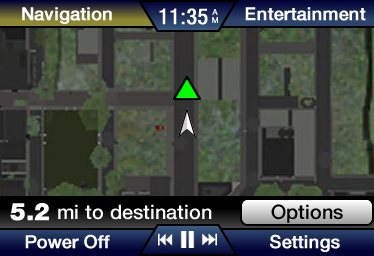
The NTBI SatNav System II, installed in your vehicle, features a new navigation mode which directs the driver to an address. This service is only available in select regions, listed here.
To navigate to an address, make sure the display is in Navigation mode, then click the Options button to open the destination screen. Click Set, then enter the address you want to navigate to. The system will attempt to "clean up" any entry, so don't worry about abbreviations or capitalization (for example, "123 MAIN ST" is the same as "123 Main Street"). To return to the map screen, click Show Map. The direction to your destination will be shown by a colored arrow and the distance will be displayed at the bottom of the screen.
The NTBI SatNav System II also has a Settings page, accessible by clicking Settings, which allows you to change a variety of settings on the vehicle.
The Entertainment page is for the Sei Audio Player, which is described below.
The Power Off button will turn the screen off, although media (if playing) will continue to play.
Your vehicle comes installed with a Sei Audio Player, under the Entertainment screen in the NTBI SatNav System II. The Sei Audio Player allows you to play full-length music tracks, individually or sequentially, without having to deal with rezzed objects or prim media.
To load a track (or disk), click the Load File button on the Sei Audio Player screen. Then, you can enter one of the following:
- SAL File Link - these are short "links" which download a track to the player. A list of free music is available here.
- SAD File (Sei Audio Disk) - these are combinations of SAL links into a single "disk". In the free music listings, you can create your own disks.
- Sound UUID - right click a sound file in Second Life and select "Copy Asset UUID", then paste it here. This will loop the sound.
The main controls are at the bottom of the screen, and are always shown. The volume control and track controls are in the Entertainment screen.
Unfortunately, the Sei Audio Player's playback may be affected by your driving speed. This is a known bug which can only be fixed by Linden Lab, whom we have notified. Until this is fixed, we recommend using the Sei Audio Player only while parked.
The NTBI Tracker Dual Radar, installed on police models of your vehicle (optionally removable for fire or other emergency services), features the most advanced, realistic detection algorithms in Second Life. We have worked hard to accurately recreate every aspect of a real speed radar unit.
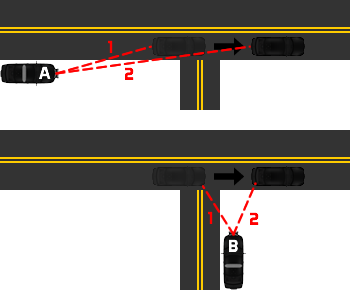
The Tracker Dual Radar has been drastically updated for the SZYM Intruder 6. The most notable change is cosine effect. This more accurately simulates how an actual speed radar calculates an object's speed. The image on the left shows two scenarios - patrol cars A and B - which demonstrate two different angles of measuring the passing vehicle's speed. The red beams are the individual radar pulses that are sent out, which detect distance. Speed radar calculates the difference between these two pulses, then divides it by the difference in time between the two pulses, to generate the vehicle's speed. However, one of these patrol cars won't be getting accurate readings.
As you can see, Car A's beams show two different distances, which allow the radar unit to display a roughly accurate speed. On the other hand, Car B's beams show the same distance, so the vehicle's speed would be calculated as zero, even though it is moving. In broader terms, the more a vehicle's path is perpendicular to the path between it and your vehicle, the less accurate the speed reading will be. For a detailed explanation on the cosine effect, click here.
The Tracker Dual Radar also detects whether the moving object is in your line of sight. Other radars scan for moving objects within their detection range and always report them, even if they are behind obstructions such as buildings and other vehicles. The Tracker Dual only reports vehicles which can actually be seen.
However, let's get to the more practical side of things - how to actually operate your Tracker Dual Radar.
The SZYM Intruder 6 is equipped with a rear radar, which can be selected by pressing the REAR button on the EVHUD. This will switch the FRONT icon to REAR, indicating that the rear radar is being used.
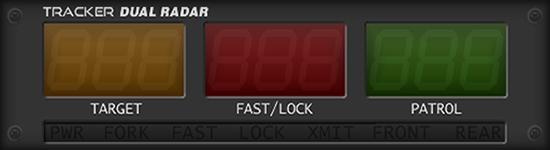
The Tracker Dual Radar has a LOCK feature. This allows you to capture the current speed from the TARGET window (unless the FAST window is displaying a speed, in which case the FAST speed will be captured) and show it permanently on the FAST/LOCK display. To enable/disable LOCK, press the LOCK button on the EVHUD.
Finally, let's go over what the different displays actually mean:
- TARGET - this displays the speed of the closest moving target object.
- FAST/LOCK - this displays one of two speeds, depending on what is shown in the lower indicator panel:
- FAST - this means that multiple objects are being tracked, and that the closest object is not the fastest object. In this case, an object further away is moving faster, and its speed is displayed here.
- LOCK - this means that the speed displayed is a locked speed of a vehicle that was detected earlier. This is explained above.
- PATROL - this displays your own speed.
The Gentek Taximeter, installed on the Taxi package of your SZYM Intruder 6, is unquestionably the most realistic and advanced taximeter available.
First, an overview of each display:
- FARE - this displays the combined fare (time + distance). Also includes price of extras once fare is complete.
- EXTRAS - this displays the extra fees added by the driver.
- RATE - this displays which rate code is being used. Different rate codes can be set up through Web Config for different fare amounts.
Although you may think this system is simple at first glance, there is a lot of customization that you can perform to make it truly yours.
In Web Config, under Options, you will see Taximeter Fare Options. This provides a large variety of customization to make your own pricing schedule. Generally, different rate codes are used for different trips - for example, rate 1 may be downtown, while rate 2 may be to a suburb, and rate 3 may be to an airport. Of course, this is totally optional.
Operation of the taximeter is simple. Press the HIRED button on the EVHUD to start a fare. To add a 50¢ fee (extra passengers, bags, etc.), click the EXTRA button. To end the fare, press the HIRED button again. The total is displayed, and the fare is completed.
You can disable the time fare (for example, if you're stopping on your own accord during a fare and want to pause the meter) by pressing TIMEOFF.
You can shut down the taximeter entirely by pressing OFFDTY.
Your vehicle is also equipped with an ad board which can display different lighted indicators depending on your status (hired, available, off duty).
The SZYM Intruder 6 features several interactive features inside the vehicle:
- Horn - click the steering wheel to sound the horn.
- Gauge Cluster - the gauges in the dashboard are fully functional and show a variety of information.
- The power ratio is not a tachometer - it displays the engine output power. This will increase when the vehicle is going uphill, etc.
- Headlight Switch - click the headlight switch to cycle through your headlights, much like the comparable EVHUD switch does.
- Window Switches - all windows are fully functional, and each door has a window switch (except the rear switches, if they have been disabled).
- Click a switch briefly to fully roll the window up or down, or click and hold, then release to stop the window mid-movement.
- The driver door has window switches for all windows; these can be used to control each window separately.
- The driver door also has a lock button - when green (locked), passenger switches are disabled, and only the driver can control the windows.
Dome Light - click the dome light to use it. The dome light also projects local light into the vehicle.
Sun Visors - click the sun visors to open and close them, if equipped (some packages have them removed).- Click the vanity mirror cover to open it and turn on the vanity light, which features a projected local light.
Digital Compass - the mirror features an embedded digital compass, which always shows the direction of the vehicle.
NTBI SatNav System II - described in detail in the NTBI SatNav System II section above.
A/C Controls - the climate controls are fully functional (but don't actually heat or cool the air, unless you have a good imagination).
Power Seat - this vehicle features a power driver's seat, activated by stopping the engine and selecting Adjust Seat from the menu.- Use your Up/W, Down/S, PgUp/E, and PgDown/C keys to move the seat.
- The power seat automatically saves the seat position of the last 20 drivers, and will load them when the driver re-enter the vehicle.
Dashcam - the front passenger can select Dashcam camera view to look through the dashcam.- For a better FOV, press Ctrl+9, then press Ctrl+0 two or three times. Press Ctrl+9 after exiting dashcam view to restore your FOV.
- If the dashcam is not hidden and the ignition is on, an overlay is shown with the time and date, along with a flashing lights indicator.
- The driver cannot use the Dashcam camera; only the front passenger can.
Glove Compartment - click to open and close it.
BluComm MDT - on some packages, the BluComm MDT features a prim media browser with access to BluComm.- For security reasons, this screen is not synchronized with those around you - others will only see the login page.
- For more information about BluComm, click here.
- Doors - all four doors, trunk, and fuel door can be clicked to open & close them.
- Hood - the hood can be unlatched by clicking the hood release to the left of the pedals (inside the vehicle, under the dashboard).
- Spotlights - the spotlights can be turned on and off by clicking them, as well as through the EVHUD.
- Global Fuel System (GFS) - this vehicle is equipped with GFS, which simulates fuel consumption while idling and driving.
- GFS is disabled by default, so you will not run out of fuel. You must opt-in to GFS through Web Config (Finalize page, under Fuel System).
- To add fuel, visit one of the many GFS gas stations around the grid. For more information, or to get free GFS equipment, click here.
- Engine Fan - the engine fan will run when the vehicle is idling and/or when the air conditioning is turned on.
- Materials - this vehicle is equipped with materials. To view them, you must have Advanced Lighting Model enabled in your graphics preferences.
- We are aware that many users can't have the Advanced Lighting Model on all the time. Because of this, we've designed the materials on this vehicle to only be subtle effects that are purely optional.
- Why can't my friend drive the vehicle?
- The vehicle is set to owner-only by default. Go to Man Config ➨ Access and select either "Group" (if your friend is in the same group) or "Everyone". Alternatively, if you only want to allow one person to drive your vehicle, select "Guest Driver" and enter their name - they will be given access to the vehicle. These options are also available in Web Config.
- Why can't I open the trunk or use the equipment inside?
- You may be clicking the corner hideaway overlay - try alt-camming around to avoid it. Unfortunately, this is required to compensate for Second Life's aggressive LOD optimization.
- The prim media on the BluComm MDT doesn't load for me.
- Sometimes prim media glitches out and refuses to load the page; try relogging to fix this.
- Why does the overlay in the Dashcam camera mode float around?
- Second Life's poor camera controls means the viewer's placement of the camera is not fully in-sync with the object it is anchored to - this is an unavoidable flaw with the static camera controls.
- I shift-dragged or copied my vehicle using "copy selection" to make a copy, and now it says "All configuration data has been lost!"
- The vehicle's ECU and configuration must be reloaded when the vehicle is duplicated in this manner. This is due to a long-established Second Life "feature". Once your vehicle finishes loading settings, copy the config code from the previous vehicle (or load it in Web Config) to transfer the configuration over. We recommend taking a copy of the vehicle then re-rezzing it to avoid this problem.
- The trunk equipment doesn't work on my land.
- This is a SL bug where temp attachments do not retain the group of the object they are rezzed from. This means on land with no-rez owned by a group, the equipment will not work, even if you and the car are both set to the land group. The only solution to this problem is to set your land to allow rez for anyone. We have informed Linden Lab about this bug, but they haven't fixed it for years.
Please read these instructions before creating custom graphics for your vehicle. They are important, and will save you a ton of trouble later.
We strongly recommend using local textures while creating your theme. All Second Life viewers should support local textures (including the LL "vanilla" viewer). Local textures allow you to apply a texture to an object without actually uploading it and paying L$10, but only you will be able to view it. Additionally, local textures update instantly, so you can view your changes almost immediately after saving to the file.
The following is a step-by-step guide for creating a theme:
- Download the template and save it to your computer. Note that Photoshop Elements does not support PSDs with layers.
- Get a copy of the free Texture Grabber tool (online or in person at an NTBI Distribution Terminal - one is located in the Astaro store).
- Start designing your theme.
- Save as a JPG when you are ready to preview it. Make sure you save as the maximum quality. Do not save as PNG, TGA, or any other format.
- Rez the Texture Grabber and select a colored face using the Select Face tool.
- Click the texture on the Texture tab to open the texture selection window, then click the Local option.
- Click the Add button, select the JPG file you just created, and apply it.
- Touch that face on the Texture Grabber. You will be given the UUID of your local texture in chat. Use this UUID as a custom theme.
- Overwrite the JPG whenever you make changes on the theme, and they will appear instantly on the vehicle without any upload costs.
- IMPORTANT: once you are finished, make sure you upload the JPG file normally and apply it to the vehicle. If you don't upload it as a normal texture, nobody else will be able to see it.
Here are the graphics templates available for this vehicle:
Specular and normal maps are for advanced use only. They are only for users with knowledge of Second Life's materials system. Pseudo-reflective decals can be made by adding them to the specular map (do not edit the alpha channel). Save these textures as TGA 32-bit with alpha channel.
The following is a list of known issues for the latest version (v6.1.1):
- The camera can sometimes get stuck under the ground when you get into the vehicle. This is a known bug that LL won't fix. To reset the camera, enter and exit mouselook or select a camera manually.
- Vehicle may get stuck on mesh roads. See this page for more information on mesh roads.
To report any other bugs, make suggestions, or ask general questions, contact us.
For direct assistance with this vehicle and its components, please IM Will Szymborska in-world.
As the release notes are quite long, click here to read them.
And of course, credit where credit is due:
- Will Szymborska - Project Lead & Texture Designer
- Nelson Jenkins - Scripter & Web Developer
- Lyte Rae - Modeler
- DriverKid Baxter - Animator
- And finally, many thanks to our beta testers and all of our customers!
SZYM. Eight Years of Excellence.
An NTBI Group Affiliate

